Introduction to ROS
Overview
Robot Operating System (ROS) is a collection of software frameworks for robot software developments. Although ROS is not an operating system, it provides services designed for a heterogeneous computer cluster and a majority of the packages are open source. One of its main advantages is that the client libraries (C++ and Python) allow nodes written in different programming languages to communicate. It is a powerful tool embedded with hardware abstraction, low-level device control, implementation of commonly used functionality, message-passing between processes, and package management. While here we will only list the basic (key) components that might be used.
Terminologies
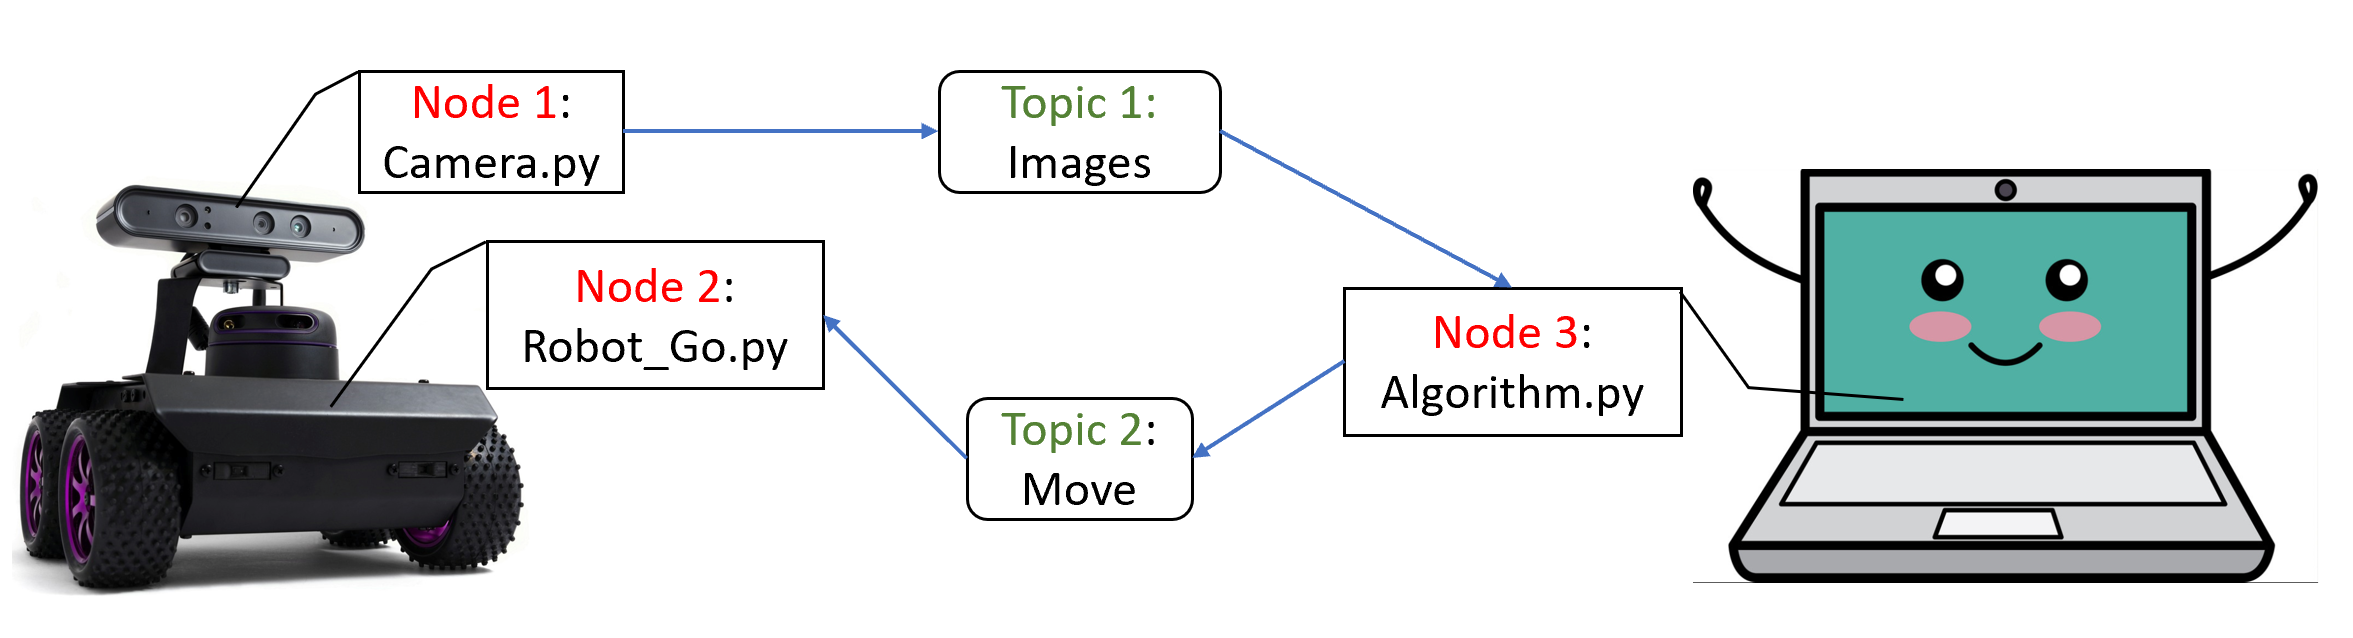
In ROS, all resources (e.g., data from different sensors) are “Messages” of Nodes.
These “Messages”” could be accessed and transmitted among Nodes as Topics (as well as Services and Actions).
Node: An executable file, can publish or subscribe to aTopic.Topic: Nodes are communicating over aTopic.PublishorSubscribe: Broadcast or receive the “Message”
Their relation could be expressed in the following figure.
Writing a Publisher in Python
#!/usr/bin/env python3

import rospy
from std_msgs.msg import String, Header

def talker():
    rospy.init_node('talker')
    pub = rospy.Publisher('chatter', String, queue_size = 10)
    rate = rospy.Rate(10) # 10hz

    while not rospy.is_shutdown():
      header = Header()
      header.stamp = rospy.Time.now()

      content = "welcome to the Robotics Lab " + str(header.stamp)
      pub.publish(content)
      rate.sleep()


if __name__ == '__main__':
    try:
        talker()
    except rospy.ROSInterruptException:
        pass
Now we are going to explain each sentence of the sample script. Please read carefully and try to write your own code.
- This first line makes sure your code is executed as a python script.
#!/usr/bin/env python3
- As mentioned, “rospy” is the python client library that needs to be imported if you are writting a ROS Node.
import rospy
- This line imports a well-defined message type “String” that will be later used in “rospy.Publisher”. You could find all information about a type of message by typing
$message$ roson google. Most of the message types could be found at std_msgs or common_msgs.
from std_msgs.msg import String
- Initialize the node with name “talker”.
rospy.init_node('talker')
- Declare a
publisherthat yournode“talker” will publish messages to thetopic“chatter”. The format of the message is defined as “String”, i.e. the topic using the message type “String”. The “queue_size” limits the amount of queued messages if any subscriber is not receiving them fast enough.
pub = rospy.Publisher('chatter', String, queue_size = 10)
- This loop is a fairly standard rospy construct: checking the “rospy.is_shutdown()” flag and then doing work. In this case, the “work” is a call to
pub.publish(content)that publishes a string to our “chatter”topic. Keep in mind that the “content” has format “String” (consistent with what we declared in “pub”). Along with the string information we concat also the corresponding timestamp data, by storing it first in a “Header” variable. The loop calls “rate.sleep()”, which sleeps just long enough to maintain the desired rate (10 hz in that script) through the loop.
while not rospy.is_shutdown():
    content = "welcome to the Robotics Lab %s"
    pub.publish(content)
    rate.sleep()
Writing a Subscriber in Python
#!/usr/bin/env python3

import rospy
from std_msgs.msg import String

def callback(data):
    rospy.loginfo(data.data) # Please consider why ".data" gives the content of "String"


def listener():
    rospy.init_node('listener')
    rospy.Subscriber('chatter', String, callback)
    rospy.spin()


if __name__ == '__main__':
    listener()
- Declare a
subscriberthat yournode“listener” will subscribe to messages from thetopic“chatter”. The format of the message is defined as “String” and the received data are stored in the “callback” function. spin() keeps python from exiting until this node is stopped
rospy.Subscriber('chatter', String, callback)
rospy.spin()
The code for Subscriber is similar to Publisher. The main difference is the Subscriber will call a “callback” function when new messages are received.
Note that the “callback” is a void function, i.e. it can’t return anything.
So if we want to utilize the received message, we will introduce the Python “Classes”. It provides a means of bundling data and functionality together.
Here we will give a simple example to show how to combine Publisher with Subscriber and how to commit data collected in “callback” function through the script.
(Note the code here is only for explaining the usage but make no sense in terms of control.)
#!/usr/bin/env python

import rospy
import numpy as np
from nav_msgs.msg import Odometry
from geometry_msgs.msg import Twist, Pose2D


class Bot():
    def __init__(self):
        # Initializaiton
        N = 20
        self.vel = Twist()
        self.pose = Pose2D()

        rospy.init_node('BotControl')
        self.pub = rospy.Publisher("/cmd_vel", Twist, queue_size =10)
        rospy.Subscriber("/odom", Odometry, self.odom_callback)
        self.rate = rospy.Rate(10)

        for i in range(N):
            self.controller(self.pose)
            self.rate.sleep()
        self.shutdown()


    def controller(self, state):
        self.vel.linear.x = -state.x
        self.vel.angular.z = 0.0
        self.pub.publish(self.vel)


    def odom_callback(self, data):
        self.pose.x = data.pose.pose.position.x # Please check the defination of message type "Odometry" to see why we could get the content in this way.
        self.pose.y = data.pose.pose.position.y


    def shutdown(self):
        rospy.loginfo("stop")
        stop_vel = Twist()
        stop_vel.linear.x = 0
        stop_vel.angular.z = 0
        self.pub.publish(stop_vel)


if __name__ == '__main__':
    try:
        Bot()
    except rospy.ROSInterruptException:
        pass
In the script above, we show how to communicate with a robot and design a feedback controller for it using ROS.
Firstly, we do initialization and propagate the system in the __init__ function.
Once we initialize the Subscriber, the data in odom_callback will keep updating its information according to the new received data from topic /odom.
So the variable pose will also keep updating.
At every 0.01s (10 hz), when we run the controller function, it can use current pose as feedback information for control.
Then the control inputs are published to topic /cmd_vel, which will be subscribed by the robot as current command.
Using rqt_graph
rqt_graphis a good tool to clarify the relations among topics and nodes by providing a ROS communication graph.
You could check whether your communication algorithm works or not. To use it, just open a new terminal and type rqt_graph, an example is shown as follows.

Frequently-used Commands
roscore: You must have a roscore running in order for ROS nodes to communicate. It will start up a ROS Master, a ROS Server and a rosout logging node.roslaunch $package_name$ $file.launch$: is for easily launching multiple ROS nodes as well as setting parameters. Aroslaunchwill automatically startroscore.rosnode list: lists all active nodes that are currently running.rosnode info $node$: show information of the node, e.g., publications; subscriptions.rostopic list: print information about active topicsrostopic echo $topic$: print message to screen.rostopic type $topic$: print topic type (message type)rosrun $package$ $executable$:rosrun allows you to run an executable in an arbitrary package from anywhere without having to give its full path
Communication with Gazebo Simulator
Gazebo is an open-source 3D robotics simulator. It offers the ability to accurately and efficiently simulate populations of robots in complex indoor and outdoor environments. You could use it for rapidly and safely testing your algorithms, designing robots and collecting or training a large amount of data using realistic scenarios. Generally speaking, if you use an existing robot, you could find its model in their documents. If you are building your own robot and want to simulate it in Gazebo, please look at the tutorial.
Resources
- Finding answers to your problems: https://answers.ros.org/questions/
- Cheatsheets: https://github.com/ros/cheatsheet/releases/